Extensively Updated 15/04/2015

Macaws gliding over golden mists, rising from the rainforest canopy in a drone photo from the Ecuadorian Amazon, 2017.
Obviously the focus up to this point has been on macro. However, landscape photography is an essential ingredient for setting the scene and creating context for many macro photos. Besides which many people travel to these remote corners of the globe, just to photograph such locations, so it would be a shame to forsake such an opportunity on account of lack of experience, lack of knowledge or lack of preparation. If you do decide to publish, many editors like to see a landscape photo which sets the scene and can provide background information on where such marvellous creatures can be found. Even when they don’t specifically ask, I have found that offering up such a contribution still works in one’s favour. When taken from remote jungle, or high mountaintops it can show the efforts that went into a photo in a way that a caption like “deep jungle” simply fails to do.
I find it to be especially important in chronicling my tales of woe and misfortune in my adventure blogging. Keep in mind though that books have been written on the subject and to be perfectly honest, it’s not by area of expertise, so take what I say within the context of macro photography and documenting the travails of trekking across the globe rather than a how-to guide for flawless landscape photography. NB. If you’re interested solely in the photos, then the most recent (and better) photos can be found towards the bottom of the page.
When to shoot
Landscape photographers go on about the golden hours, sunrise and sunset. Undoubtedly these hours are important and indeed transformative in some cases.

Sunrise at Cerro Mesa, one of the highest points on Santa Cruz island in the Galapagos is a fleeting and magical moment. Photos at other points in the day don’t quite capture the same beautiful qualities. Photo from Santa Cruz island, Ecuador. Copyright Paul Bertner 2016.
However, the rest of the day should not be neglected. The key to an engaging photo to my mind is atmosphere. Fog, mist, clouds, contrast, rain, snow, all these elements add interest to a photo and should be pursued rather than avoided.
It was just about the start of the rainy season and I’d just come from a miserably wet bogland (Read full story HERE). The rainclouds constantly threatened and I was reluctant to offer up my camera gear as another sacrifice. However, between the option of staying in and nursing leech bites and going on a trek to find the beautiful and endemic ‘doughnut pitcher plant’, Nepenthes aristolochioides, (It’s much more beautiful than it sounds) I opted for the latter. Danau gunung tujuh or 7 mountains lake is only a short 3 hr hike from the nearest village and is the site of these wonderful carnivorous plants. Clouds rolled overtop of the lake and mountains and brief spats of rain interrupted my 2hr shoot with the plants, however I was more than justly recompensed for my gamble (Full story HERE).
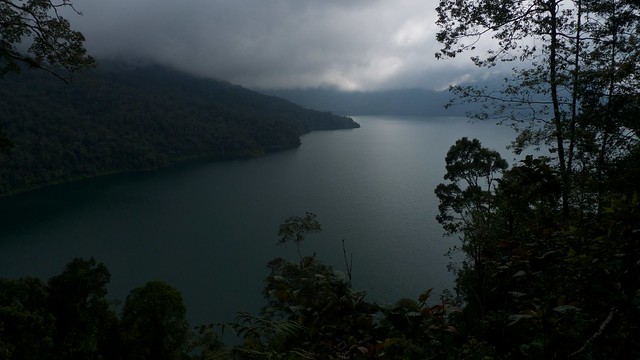
Storm clouds over 7 Mountains lake in Sumatra, Indonesia. Copyright Paul Bertner 2013.
One of my favourite landscape photos from my last trip to Indonesia was the shot below. I feel like I got most of the elements and balance right in this shot. Taken on Gunung Kerinci on the island of Sumatra. Kerinci is the 2nd highest climbable volcano in the area and attracts mountaineers from all over Indonesia. The climb itself is strenuous, though not overly so. Nevertheless summiting by sunrise still requires waking up at ungodly hours, braving the bracing cold, the shrieking wind and the icy rain. The view from the summit itself was choked with fog and I was most disappointed. However, while descending the mountain, the clouds parted briefly and I was able not only to get a partial view of landscape, but also to document the arduous climb upwards. I feel like the barren scree above the treeline, the roiling mists, the dark foreboding clouds, golden dawn, scenery and the dwarfed and almost insignificant climber combine together to make this a memorable photo. The climber is in the bottom right so as to emphasize the distance yet to climb, as well as show the steep angle of incline. I was fortuitous that the climber was wearing a poncho which whipped about with the wind and subtly gave more character to the shrill wind.
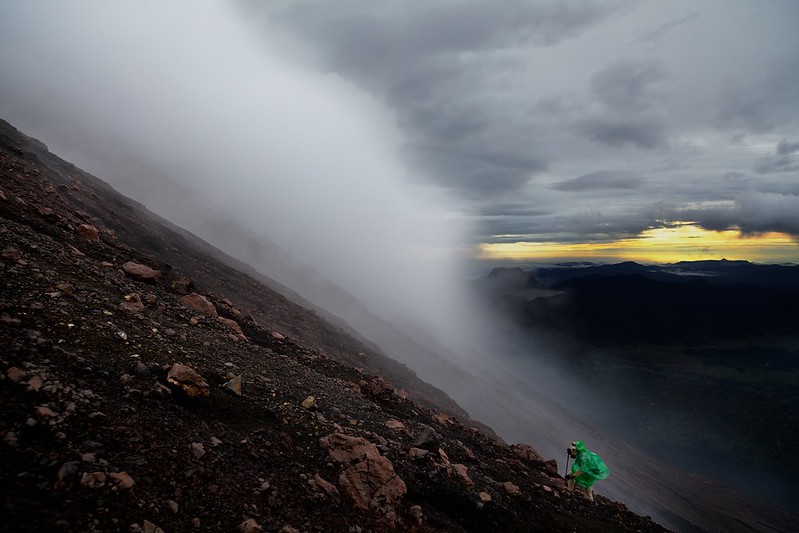
Climbing Gunung Kerinci to photograph the Giant red leech, a previously undocumented species. Photo taken on Gunung Kerinci summit, Indonesia. Copyright Paul Bertner 2013.
The Process
It can sometimes be daunting browsing through a photographer’s portfolio. Why would they ever put their failures up for all to see? In fact the reason is manifold. Not only do they wish to appear as professional as possible, but errors, the unpolished work might also give clues to their technique. After all, knowledge and experience is learning from one’s own failures, however; wisdom is learning from the failures of others.
I have often found the importance of documenting one’s failures alongside one’s successes. This not only acts as a kind of photographic journal, but can also be used for future reference should you find yourself in similar circumstances (not to mention that it’s a little humbling putting out your failures for all to see). Although I had initially planned on deleting all my pictures from the chocolate hills on the island of Bohol (Philippines), I decided that putting them on display and walking through my method and thought process might prove useful to others, despite the fact that there are few if any salvageable photos in the lot.
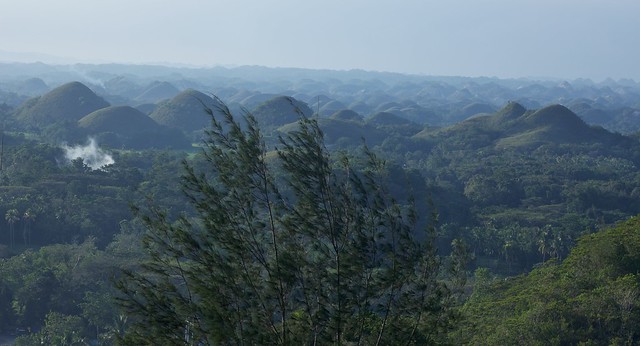
An attempt to incorporate foreground elements to block out and draw attention away from farmland. Photo taken in the chocolate hills, Philippines. Copyright Paul Bertner 2014.
Like the previous picture, I hoped that perhaps by shooting through a foreground subject I might be able to divert attention away from the lacklustre landscape. In this case it wasn’t successful. Photo taken in the chocolate hills, Philippines. Copyright Paul Bertner 2014.
Nevertheless, the photos do demonstrate some principles borne of experience which are applicable to other scenarios. For example, knowledge of local practices like the burning of trash, agricultural clearing or nighttime fires common to many SE Asian settlements can create haze which can negatively impact photos. Research beforehand the most up to date information on the area you plan to visit since a pristine area may have undergone development since it was last publicly photographed/updated on Wikipedia.
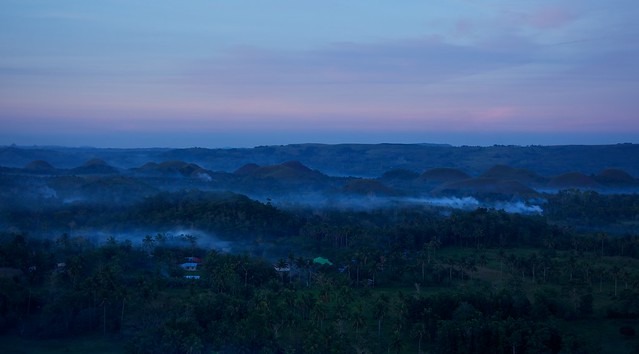
Trash and agricultural burning can create haze, especially in the evening hours. Photo taken in the chocolate hills, Philippines. Copyright Paul Bertner 2014.
Sometimes just as important as the location is the time, weather and other elements beyond the photographer’s control which can utterly transform a landscape. A good example of this is the chocolate hills, a tourist draw on the island of Bohol in the Philippines. I had seen pictures online and was immediately drawn in and made a special effort to get there. The online pictures had piqued my curiosity, however I didn’t see any that truly inspired me. Could I be the first to capture this magnificent landscape in a way it deserved?
However, upon my arrival I was quite disappointed. The reality of the place didn’t seem to match the photographs I’d seen. The ‘forest’ from the photographs which looked like it occupied the valleys in between the hills was in reality quite sparse and was more farmland than forest.
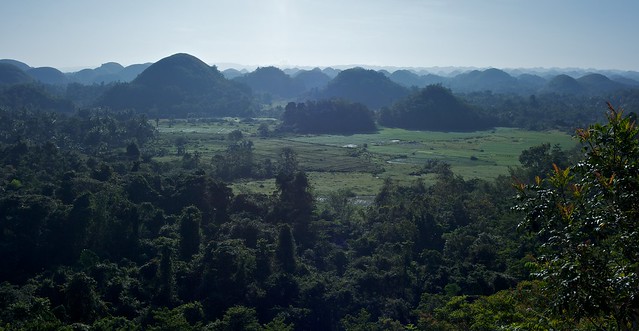
The unfortunate reality. Rice patties interrupt the spaces between hills and haze blots out a beautiful blue sky. Photo taken in the chocolate hills, Philippines. Copyright Paul Bertner 2014.
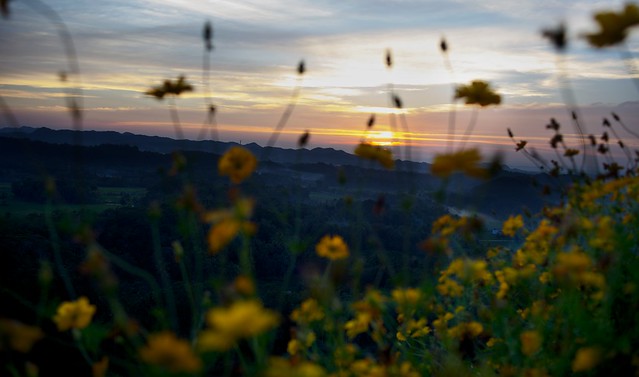
Late in the day haze from burning trash made sharp photos next to impossible and to cap it all off, the sun set not in front or behind the hills, but to the side behind farmland, making for a weaker composition.

Despite the fact that there’s a sunset, a misty haze, a few hills and even a flock of birds (bottom left) the picture still fails to impress in my eyes. This is largely due to the sunset not setting directly behind the hills which would make for a much more impressive display. Photo taken in the chocolate hills, Philippines. Copyright Paul Bertner 2014.
The following day I woke up at 4AM and drove my scooter an hour along the potholed roads to reach the lookout point in time for sunrise. Unfortunately the sunrise too was in a poor location, at least relative to my position at the lookout.
I brought my 300mm lens to see if I could zoom in on the hills to avoid some of the obstructions and perhaps frame the hills so as to avoid the ugly farms. The result wasn’t to my liking, however it was still a worthwhile exercise, as experimenting with different lenses opens up many possibilities.
Chocolate hills captured from the central viewpoint with a Canon 300mm f/2.8 lens. Photo taken in the chocolate hills, Philippines. Copyright Paul Bertner 2014.
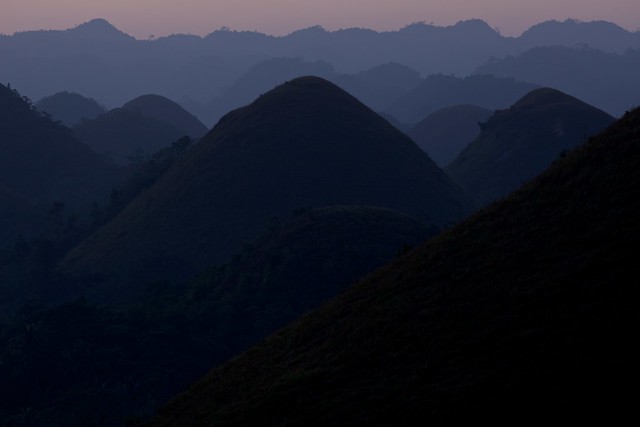
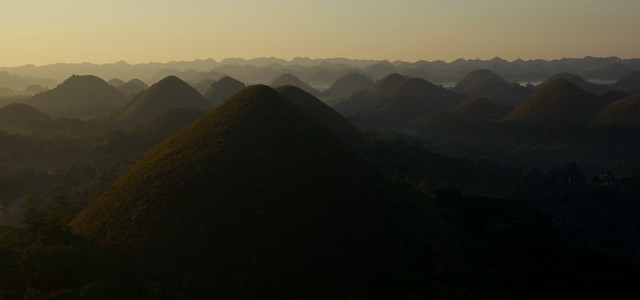
I wandered about the lookout hill and found a spot with the least number of obstructions and decided to shoot in a way to maximize shadows (to hide the farmlands and make it appear more wild, as it might have been decades ago) and appear more atmospheric, with the rising mists, rays of light and shadow outlines of the treetops and hills. The result are the below photographs which conceals more than they reveal but are beautiful all the same. Notice also that the rising mists (cooler air which settles in between the hills, is denser and doesn’t disperse as readily) have a different character and feel than the trash burning fires (the hot air from the burning fires means it rises and and disperses and therefore leads to haze which limits impacts the clarity of the photo).
An acceptable photo focusing on the hills. I had to underexpose the photo to hide the farmland and palm trees between the hills. Photo taken in the chocolate hills, Philippines. Copyright Paul Bertner 2014.
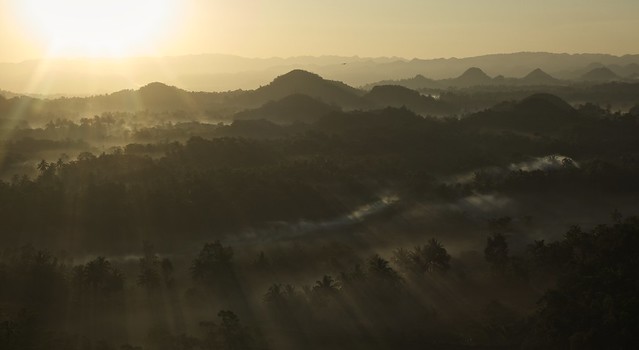
Sunrise over the chocolate hills on the island of Bohol, Philippines. Copyright Paul Bertner 2014.
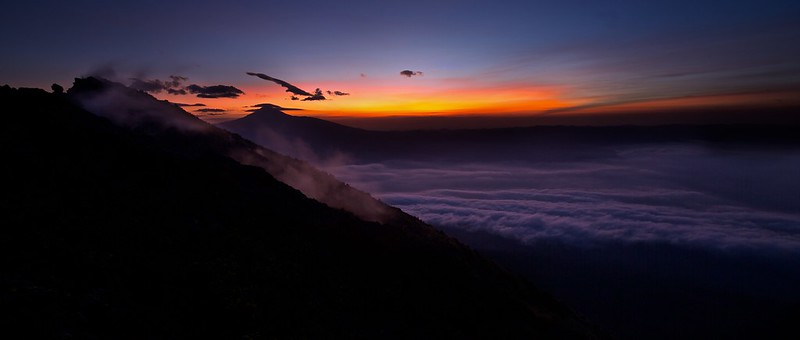
View from the top. Lookout points are natural magnets for the landscape photographer, especially in the rainforest where it can be difficult to see the forest for the trees. It is worth the extra effort to hike or summit that hill or mountain early in the morning to catch the dawn, just to enjoy if not to photograph. Early mornings in the rainforest often also produces a low lying mist due to transpiration. This can create a glow which lights up the entire horizon as the sun shines through it. During the day the mist is usually burned off and is only replenished in the cool evenings.
Sometimes the lack of detail can be a beautiful thing. Despite the oddly shaped sunburst in the top left, I actually prefer this image to the one of Mt. Bromo below. It has more atmosphere and character.
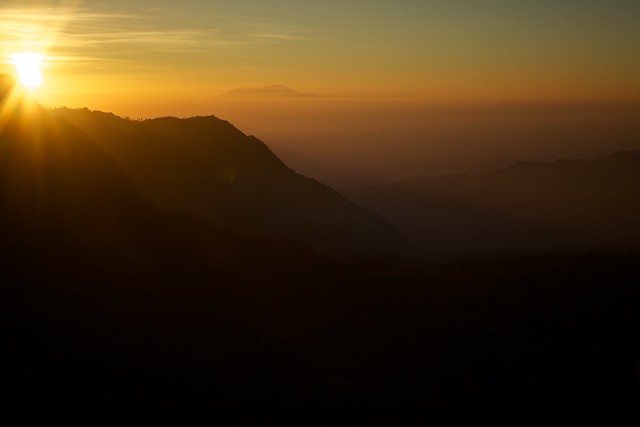
Taken during an early morning hike to Pejenakan mountain, opposite Mt. Bromo, Indonesia. Copyright Paul Bertner 2013.
Originally satisfied with this image of Mt. Bromo and Semeru in the background, I have since cooled in my liking to it. Now its composition strikes me as banal, and it doesn’t pass muster in my Google lineup test (ie. Having someone choose my photo out from a lineup of others in a Google image search). Despite the sunrise, and mists filling the valley, there are no interesting lines or compositional elements to hold the viewers interest. It is a site that I will have to revisit and think long and hard on how to shoot…maybe with a drone?

Taken during an early morning hike to Pejenakan mountain, opposite Mt. Bromo, Indonesia. Copyright Paul Bertner 2013.

Better is this view shot with a Zeiss 21mm wide angle lens. It is more atmospheric with the fog filled valley and darker, more mysterious palette. The foreground elements are bit of a wash, on the one hand they add another interesting element, on the other hand their removal wouldn’t affect the image much. The weakest compositional element is the right hand side of the image. The dark grasses create an obstruction to the more interesting fog below. Photographed in Mt. Bromo tengger Semeru national park, Indonesia. Copyright Paul Bertner 2013.
This aerial view of the wonderful Guyanan rainforest was taken from a small Cessna plane on the way back from Kaieteur falls. Sometimes by air, especially in remote areas that offer no chance of scaling mountains to achieve viewpoints, is the only choice for captivating scenic views. A polarizing filter would have deepened the greens, and made the sky much less hazy, a valuable lesson to always travel with a polarizing filter, one of the few filters which is still very difficult to reproduce even with the advent of unprecedentedly advanced post-processing techniques. When traveling into or around a country with rainforest, always consider:
1) Taking a golden hours flight
2) Asking the pilot what the route will be (for smaller (and more flexible planes) there are sometimes alternate routes that can be taken or else the pilot will sometimes loop around a particular attraction so people can get a good view). Ask beforehand and they might accommodate you.
3) Bringing a camera aboard fitted with a polarizing filter to cut down on the reflections from the window or from haze and strong sun.
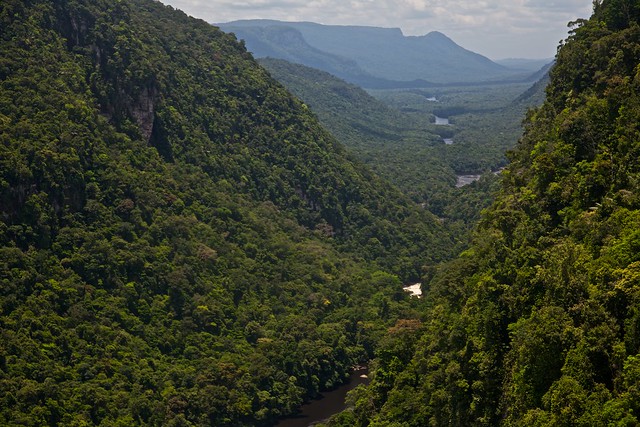
Unspoiled wilderness. The river is the Potaro which extends downwards towards Mahdia and which eventually empties into Guyana’s largest river, the Essequibo. Copyright Paul Bertner 2010.
Shooting inside the forest
Oftentimes one needs to get above the forest canopy to capture engaging photos. Unfortunately not all rainforests are so accommodating. When such is the case try dusk and dawn hours to catch sunlight streaming in through the forest canopy. This can make for enchanting photos. Note that there will be a great deal of contrast between the shadows at the forest floor and the brightness of the canopy and light rays. This would be a good job for HDR, though a single shot can still work, and sometimes the contrast is desirable, as below. Roadsides, especially in the dry season can be quite good as well, as the dust raised by passing vehicles will catch the sunlight and the rays of light will be more visible when highlighted by the motes.

Daylight streaming through the canopy on Gunung Mulu, Borneo. A crop of the left hand side to eliminate the overexposed ‘window’ would have improved the image. Copyright Paul Bertner 2009.
In cloud rainforest, high humidity and fog can pose problems with condensation on the lens and malfunctioning equipment. However, it can also provide opportunities for an atmospheric photo.

Morning mist at Altamira ranger station, La Amistad national park, Costa Rica. Copyright Paul Bertner 2012.
One advantage of the rainforest canopy is that it creates patches of light and darkness which can be visually engaging, if difficult to capture. It can also be quite a dark place, and therefore shutter times of over a second are not uncommon. This can be good for shooting streams and creating a dreamy, smooth and flowing look which is often the most visually pleasing method of shooting moving water. Outside of the jungle this might otherwise require specialized neutral density (ND) filters in order to block the light, or else waiting for a more opportune time of the day to allow for a slow enough shutter speed (typically around 0.6″).

Forest stream taken without the use of any filters. Photo taken in Nyungwe national park, Rwanda. Copyright Paul Bertner 2015.
Waterfalls
Waterfalls range from iconic and touristy to hidden and secretive. There are people that specialize in just this and so despite their beauty it can oftentimes be difficult to achieve a unique waterfall photo. Nevertheless, they are an important part of the landscape in rainforests and worthy of mention. Moreover, many insects, amphibians and reptiles can be found along the stream banks and in the cascading pools around a waterfall. These are early attempts and nowadays I would add in a polarizing filter and make some modifications in post processing and probably get closer and use a wide-angle lens.

The azul waters are achieved through rich mineral deposits upstream. The waterfall basin is a big tourist draw, though one that still merits fighting through the crowds. Day hike in Volcan Tenorio national park, Costa Rica.
Kaieteur falls in Guyana is iconic and the largest (by volume), single drop (rather than tiered) waterfall in the world. Again, a polarizing filter to bring out the blue sky and deepen the forest greens would have been ideal.

This image could have been improved by the use of a polarizing filter which would have deepened the blues in the sky, enhanced the double rainbow and cut some of the haze from the mid-morning sun. Photo taken at Kaieteur fall, Guyana. Copyright Paul Bertner 2010.
Choosing a focal point
Rainforests can be dark places with little to distinguish one location from another. The forest can appear uniform and as a result there are few features to draw the viewer in. In these situations, a person, tent, or other focal point not normally found in such an environment can help generate interest. It is also helpful in the context of a narrative. Look for interesting roots, lianas, shapes and colours and make it the central point of focus from which the rest of the forest radiates.
Although the two photos below were shot with a lumix LX3 point and shoot and were meant more as a documentarian complement to my adventure blog, they could certainly have been improved upon. The first has too much foreground which is unvaried and uninteresting. Either an ND grad filter could have been used to tone down the bright top 1/3rd or else HDR or simple underexposure could have worked as well. The second shot has a more interesting composition.

A personal touch. Photo taken in Braulio Carillo national park, Costa Rica. Copyright Paul Bertner 2012.
Here a crop of the overexposed right-hand margin would provide significant improvement. Toning down the white, overexposed patches of sky which exhibit glare would also benefit the image. Having said that, the vertical orientation, especially with the moss-clad trees and huge bird’s-nest ferns are quite lovely and provide perspective of the height of the canopy, the varied vegetation as one transitions through the forest stories and the smallness of the hammock and its resident. This is an image I would like to retake in the future and rework, possibly in the afternoon or early morning hours when glare would be less of an issue.

Forest camping. Photo from Ladeh Panjang bog forest, Indonesia. Copyright Paul Bertner 2013.
Camps, huts or other human structures can also stand out in an interesting way when presented with a sense of negative space or vastness. One example is a tent (typically illuminated and at night) set against a backdrop of formidable mountains. Such photos have have so often graced the covers of outdoors magazines that they has become commonplace . The below example shows huts on the crater rim of Nyiragongo volcano. They act as a focal point against the starlit sky. The smouldering clouds illuminated from the volcanic flows add further interest and the green bush adds a bit of colour and contrast. The foreground and huts were lit by light painting with a flashlight and the stars by a long, 30 second exposure.
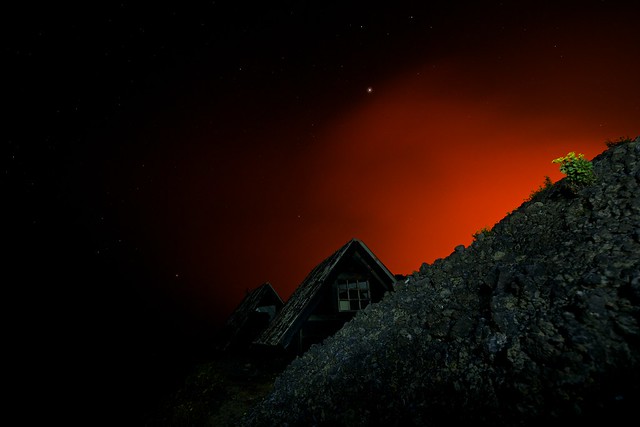
Huts on the crater rim of Nyiragongo volcano. Photo taken in Virunga national park, DRC. Copyright Paul Bertner 2015.

The texture of the ripples in the waves, the colours and the silhouette of the boaters offers an evocative narrative. Photo taken outside Amacayacu national park, Colombia. Copyright Paul Bertner 2018.
Lens choice
Landscapes are incredibly varied and it is really up to the individual tastes of the photographer as to how they should be presented. However, the vastness of certain geological features are simply impossible to capture without the range of a wide angle. The impossibility of the terrain (gorges, ravines, mountain ranges, etc…) might mean that detail can only be achieved through telephotos. Other times approachable landscape features which can be readily navigated can be treated almost like how one would shoot a portrait.
Below shows the range, all shot at the same location at Nyiragongo volcano in the DRC. However, each is shot with a different lens in order to emphasize different features of the landscape.
The first image showcases the encompassing view of the overall landscape from the crater rim. Karisimbi volcano is in the background, and the sun rising over Rwanda. Shot with a 15mm wide angle.
View of Karisimbi volcano from Nyiragongo. Sometimes, especially during sunrise and sunset a little bit of HDR is needed to bring out the full range of colours. This was the case with the below image. What looks like cloud or steam rising in the foreground is actually a fissure with hot, volcanic gasses. Without multiple exposures it would have been too dark and wouldn’t have appeared in the photo. I decided to leave the foreground dark and the photo generally underexposed, since it contrasts nicely with the reds and makes the photo appear more natural, rather than the perfectly exposed photo that most HDR shots boast. Photo taken in Virunga national park, DRC. Copyright Paul Bertner 2015.
Finally the volcanic crater lake was shot with a 300mm with 2X teleconverter in order to give detail to the impressive violence of the fiery eruptions. The steepness of the slopes, in addition to the chemical fumes and heat emanating from the volcanic lake make approach a dangerous and impossible without the proper safety equipment.
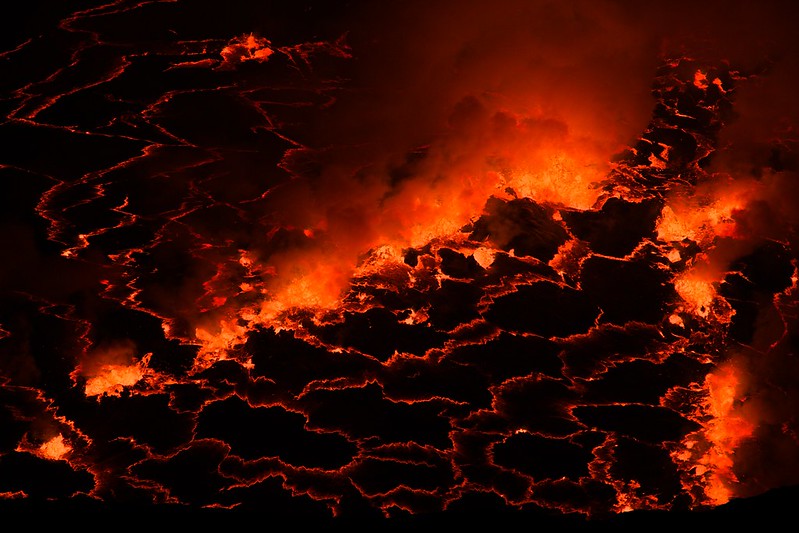
Nyiragongo volcanic lake. Photo taken in Virunga national park, DRC. Copyright Paul Bertner 2015.
As you can see, each image has its merits and so it really pays to be prepared and have a range of lenses with you. Also, experiment! You might just find that the super wide angle you thought would capture the entirety of the scene falls flat, and what really holds your interest is a fledgeling bird holding tenuously to the cliff face (ah, if only you’d brought your telephoto, alas!).
Having said all that, the preference of most photographers does seem to be to go wide. I tend to support this view as well though not for the traditional reason of capturing “more”. Rather, I like the distortion. I find that wide angles create varied and unconventional compositions which hold my interest for longer.
High Dynamic range (HDR)
Beware the dangers of overcooking your images in post-processing. This is a problem that is rife in HDR photography and one that requires both a careful review of your image, and perhaps even a trustworthy second set of eyes from either a friend or an online community (the FredMiranda landscape forum is particularly good. It is replete with very talented photographers that will offer insightful and useful C&C if asked).
The more natural looking your image, generally the more pleasing it will be. Take the two examples below, the first represents an overdone HDR that while interesting, I personally find visually jarring and not wholly to my liking. The background is too forceful whilst the foreground is too dark. There is too much contrast not to mention the angle is slightly off and the tips of the pachypodium branches too dark. The orange and yellow colours appear oversaturated and whilst evocative and impactful, it lacks the kind of finesse and quality that I would like my images to have.
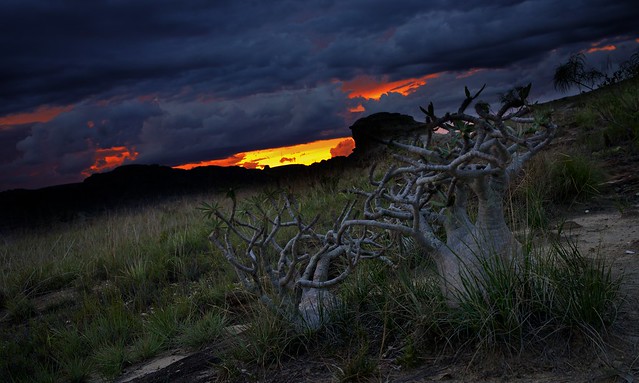
An HDR image of Pachypodiums at sunset. Photo from Isalo national park, Madagascar. Copyright Paul Bertner 2015.
This second image represents a middle ground. I am still not 100% satisfied with it. The light pinks of the sunrise don’t appear wholly natural (though still much better than the first image) and the composition on the left hand side looks as though the massif has been slightly truncated (it hasn’t but more room would have confirmed this). Perhaps less sky and more of the impressive stone formations would have led to a stronger overall image.
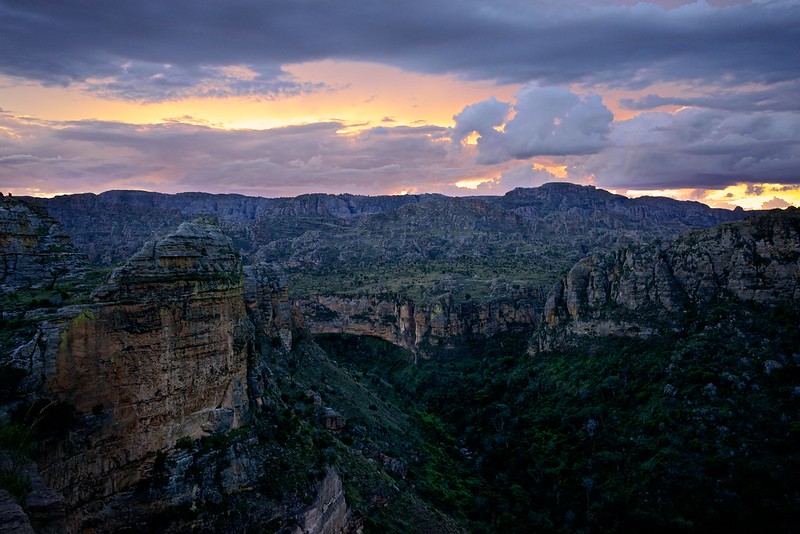
Le Cirque de Namaza. Photo from Isalo national park, Madagascar. Copyright Paul Bertner 2015.

Challuacocha lake at sunset from Sani lodge, Ecuador. Copyright Paul Bertner 2016.
Compare the above two shots to the one below, a night shot of the three sisters peaks. Here I didn’t use HDR and I even eschewed light painting in favour of the natural moonlight (the crescent moon, visible only in the second picture, provided just enough light which was then boosted in Post to further lighten the wispy clouds circling the peaks and the light greens of the forest). The darkness here even where it conceals detail (as in the middle right and left of image) might detract, but not overly so, and certainly not as it would in a daytime photo since it complements the mood and tone of a nighttime image. The colours are pleasing and meld together nicely, there is enough interest from the disparate elements which offer balance and the curves from the peaks in the background are balanced by the curves of the rocks in the foreground. The wispy cloud cover offers a crowning touch of interest which really makes the image standout and the natural touch of green from the forest combined with the night sky bespeak of wilderness. The key here is balance despite the complicated composition. You can clearly see layers, the first (foreground) are the rounded rocks. This flows into the forest and mountains (mid-ground) and finally the stars and the night sky (background). Note also that for nighttime photography one should really scout out locations before the sun goes down because once it does you might find that you are unable to navigate the terrain appropriately, unable to view even formerly readily identifiable features and your composition will likely suffer. A bit of moonlight might help, though you shouldn’t be counting on this. It has been suggested to me by another photographer whose opinion I value that this shot might have been improved further still by having taken a few twilight shots which would have illuminated the mid-scene a little more therefore giving less of a vignetted appearance.
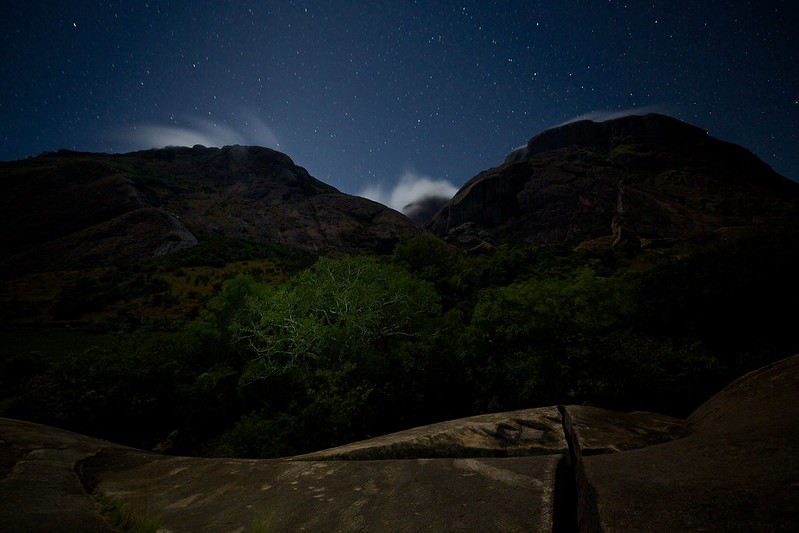
The three sisters peaks by moonlight. Photo taken in Anja reserve, Madagascar. Copyright Paul Bertner 2015.
Orientation
Consider multiple perspectives in both vertical and horizontal orientations. This is particularly appropriate with wide-angle and UWA (ultra wide-angle) lenses whose distortion can create interesting, and perhaps unpredictable results.
In this second shot of the above scene I wanted to incorporate more of the starry background and the milky way, and thus resorted to a vertical orientation. The tone is darker with less detail and for all the similarity they could still be totally different locations. The sky occupies 4/5ths of the image, dwarfing the mountains and creating a vastness of ‘partially’ negative space. I say partially because the upper 4/5ths are not totally devoid of detail and indeed provide points of interest (milky way and moonburst), however its purpose is really to accentuate the mountains below. Therefore the void can be said to create beauty for the other elements of the photo. Again, more detail in the mountain might have improved the image and could have been attained through exposure stacking.

The three sisters peaks by moonlight vertical orientation to incorporate the milky way. Photo taken in Anja reserve, Madagascar. Copyright Paul Bertner 2015.
A second example is the waterfall below, shot with a 15mm lens vertically to emphasize the spray and turbidity of the falls and white water. The radiating lines draw the viewer in. Allowing the shot to mount vertically also enables the capture of not just the dark understory but more of the mid-level flora, therefore allowing for more light, which in turn leads to additional shades of green as well as an overall brighter image.

Rainforest waterfall vertical composition. Photo from Ranomafana national park, Madagascar. Copyright Paul Bertner 2015.
The second, horizontal shot better highlights the falls themselves which are not set back quite so far as in the first image, and the boulder and the white water contouring the sides of the stream provide additional points of interest. Note that with a 15mm lens, I am about 1 metre away from the falls, therefore I am constantly wiping the lens free of water droplets between each shot, and I am just about hip-deep in water, so it does require a certain degree of dedication but the results can be quite worthwhile. It is also these extra efforts that will produce more rewarding results as the angles and compositions will hopefully be more interesting.
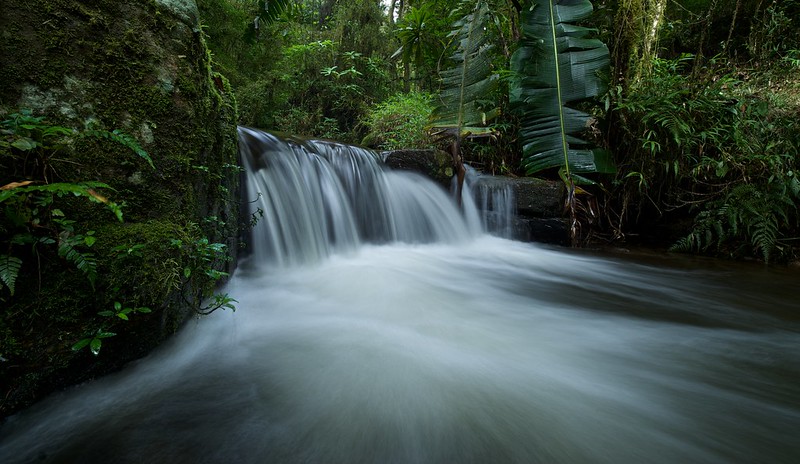
Rainforest waterfall. Photo from Ranomafana national park, Madagascar. Copyright Paul Bertner 2015.
Tripod use
More so than in macro, landscape photography benefits from the use of a good stable tripod. A flimsy tripod is worse than useless, it will waste your time, add to the weight you’re carting around and perhaps worst of all is that it will instil you with a false sense of confidence and security that you are doing everything right, and yet your images will still suffer and not live up to their full potential. Possibly a discovery that will only be made once your trip is already over and you are processing what you had thought looked good on a 3″ screen but which now looks altogether unsatisfactory on a larger monitor.
Nowadays with cellphones and tablets able to deliver photos which a few years ago were the domain of professional models, it requires increasing skill, and creativity, not to mention faultless technical skills and a mastery of even the most obscure camera functions to elevate your images above the masses. The ability to take advantage of the manual settings or the use of polarizers and grad filters can also help.
Learn to use your tripod properly. A tripod may seem like a simple tool, three extensible legs with varying number of segments depending on the model and a twist or lever lock, right? In theory, yes. However, I can say that I didn’t know the ins and outs of my tripod and thus wasn’t using it effectively until the screw connecting the ballhead to the quick release clamp broke and I was forced to use the tripod in ways I never had before. For example I was forced to fasten the camera directly to the tripod screw and therefore unable to conveniently rotate the camera into position I learned to use the two levers controlling the centre pole in novel ways to achieve similar results to a ballhead (if in a slightly more awkward and time consuming manner). This included reverse mounting the camera so that it was upside down but I had more clearance since the central pole was horizontal. I could shoot photos flush with the ground, typically the domain of specialized macro tripods, but with a little finessing managed with a full length tripod.
Or have you ever used a counterweight on the reverse hook on the bottom of the central support rod in order to further stabilize your tripod when it is either fully extended or in windy conditions in order to maximize stability? Or have you looked at the bottom screw on feet, some models have rubberized feet on one side for slippery surfaces like rocks or indoors and spiked feet on the other side for muddy or soil type ground. Of course each tripod brand and model will have its own idiosyncrasies, pros and cons and so it pays to go over it carefully from the beginning to take full advantage of all it has to offer.
Other simple things that we sometimes don’t even think about, like the seemingly obvious – not all legs need to be extended to the same extent ie. When working on a slope it can be much simpler to have the leg working furthest uphill be shorter than the two supporting legs downhill, rather than splaying them awkwardly.
I will also fully extend the legs of the tripod and use it as a balancing rod when crossing slippery rocks or when crossing streams. When combined with macro you might find your subject is out of reach. It can then be encouraged to come down by extending the tripod legs and coaxing it to a lower, more photographable position. There are many alternate uses and one is simply bounded by one’s imagination.
Night photography:
Night photography can yield pretty fantastic results. It pays to scout the area during the day (especially if there will be little moonlight).
Bring an external cable release or in newer cameras, setup the wifi in your camera and app to enable remote triggering.
Bring several extra batteries, preferably in the form of a battery grip for uninterrupted long-exposure photos (keeping in mind that colder temperatures will diminish the capacity of your batteries).

Las Grietas (The fissure) on Santa Cruz island in the Galapagos. Photo from Santa Cruz island, Ecuador. Copyright Paul Bertner 2016.

Photo from Chilcabamba lodge bordering Cotopaxi NP, Ecuador. Copyright Paul Bertner 2016.

Gas flares from distant oil wells on the horizon vie with star trails to light the night sky. Shot from a canopy tower at night using a 30 minute exposure, post-processing, single image HDR was used to brighten the image and smooth the transition between the oranges, yellows and purples.
Black and white

Cotopaxi volcano. Photo from Cotopaxi national park, Ecuador. Copyright Paul Bertner 2016.
UPDATED 24/04/2018
Drone Photography
It’s a common refrain that I tell people that I didn’t think that I would enjoy drone photography quite as much as I do. Now, I find drones to be an indispensable part of my repertoire, and I feel quite out of sorts when I am without one.
I originally bought the DJI Phantom 3 Pro, and following a collision with an overhead tree branch, a sad, traumatic day. I picked myself up, registered anonymously in various drone support groups for pilot victims, and after my confidence was sufficiently massaged back into being, I bought a new pair of wings. I switched to the more portable DJI Mavic Pro. Despite a noticeable step down in terms of quality, it is still an impressive device, and it’s portability ensures that it can thrown in a backpack to be taken along at every occasion, something entirely impossible with the larger series drones, and personally, well-worth the tradeoff.
Drone Etiquette
Drones are noisy, dangerous (we’ve all heard the flying blender analogy!), and to many, constitute an invasion of privacy. Therefore:
- Always take others’ concerns into consideration when flying, especially during the early morning hours, or when flying might cause disruption to others’ activities eg. bird-watching.
- Be aware of wildlife, and the impact your flying has on that wildlife. Drones can elicit defensive or flight responses from birds and mammals, which might endanger themselves, your drone, yourself, and potentially, any bystanders.
- Always be prepared to ground your drone, whether that comes in the form of not taking off to begin with, grounding it prematurely, or should disaster strike, executing a forced combined stick command (CSC), and losing the drone to avert a greater catastrophe.
- Have a proper exit and landing strategy in place. The DJI app is error prone, and the app will crash at some point, that’s inevitable. It’s frightening when it occurs, but if you are flying with the remote, you can still execute return to home function, and then manually land by line-of-sight.
- Don’t fly in crowded areas, and maintain a respect for sensitive areas, including but not limited to breeding areas, nesting sites, feeding sites, watering holes, around rare/sensitive species.
- Make sure that you have advised anyone nearby that you will be flying, and if you will be taking pictures/videos which might include them, first obtain their permission.
The Basics
Always carry out your pre-flight checklist. It takes only a minute, but it’s a good habit to get into, and can discover chipped propeller blades, compass disequilibrium, memory card absence/failure, etc…
Always carry at least one extra battery. Oftentimes one will have to reconnoitre an area first, or else return prematurely on account of the weather, a crashed app (affecting flight), battery life in either the phone or the remote, or else some other factor beyond prediction.
In the rainforest, the attached gimbal-mounted lens is still subject to fogging, especially in the morning immediately after takeoff as the system warms up. This will immediately frustrate any attempts at capturing that sunrise, and it can be difficult to remove the internal lens fog (which only manifests as soon as the drone has left the ground and internal temperatures rise). Therefore keep your drone, or at least the gimbal/lens dry in a drybox with silica or some other desiccant when the humidity rises (alternatively you can use a plastic bag with silica/rice and gently wrap it around just the lens, sealing it with cellophane at the top.
Some useful accessories which I use are:
- Polar Pro ND-Polarizing filters ND 4, ND 16, ND 32
- Landing feet extenders (for DJI Mavic Pro)
- Extra folding propellers
My flight procedure
Observe for any potential hazards. In the rainforest this includes lianas, vines, swaying trees or branches and depending on the forest, leaves (some dipterocarps and cecropias have giant leaves which when dislodged can entangle or else ground smaller drones). Clear the ground, or preferably elevate the drone (a pelican case works very well as a landing/takeoff pad).
Make sure that there are no immediate aerial threats (birds, overhead obstacles, impending rain, high velocity winds, etc…)
If taking off under the canopy, then engage tripod mode immediately to stabilize the drone as the drone has taken off and is hovering. Be especially sensitive to any wind, which can move branches and lianas from several metres into away into the flight path of the drone. The drone will be slightly less responsive in tripod mode, but can be maneuvered more surely between hazards. This is especially useful for navigating from out of the understory to get above the canopy. Ensure line-of-sight, and preferably check from multiple perspectives to be certain that there are no small obstacles like vines or aerial roots which might otherwise entangle the propellers.
Be aware of altitudinal changes and inconsistent canopy height. Use custom key C1/C2 to quickly change gimbal position by 90 degrees to check for potential flight hazards from below.
I generally do a fly-by first, limiting the number of photos I take in order to get a lay of the land, experimenting with different altitudes and generally not straying further than 1 km whilst choosing a position which grants me the furthest line of sight possible. I never descend below the canopy using the first person viewer on the remote, only ever by line-of-sight, so as to appropriately gauge the hazards.
Drone photography is especially good for larger geographical features which are otherwise inaccessible.

Headwaters of the Rio Pita at the foot of Sincholagua mountain in Cotopaxi national park, Ecuador. Shot with P3P drone. Copyright Paul Bertner 2016.
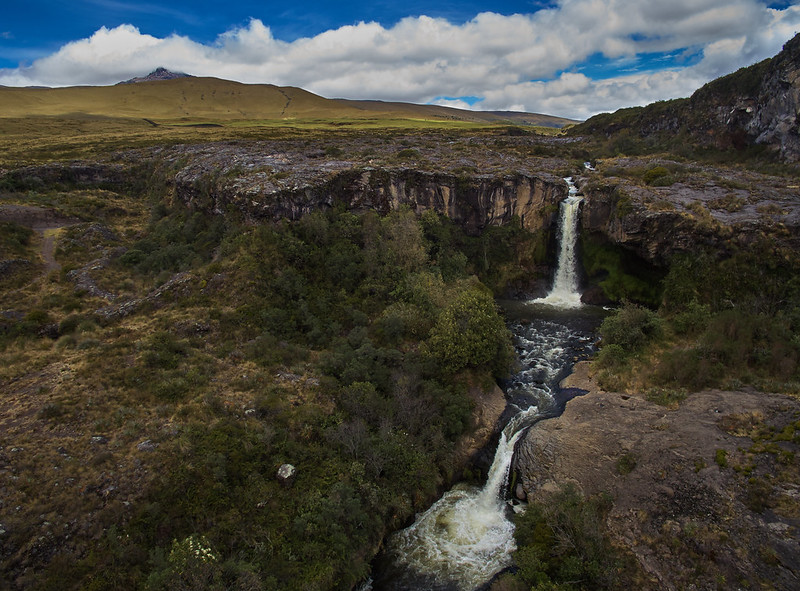
Rio Pita waterfalls from Cotopaxi NP, Ecuador. Shot with P3P drone. Copyright Paul Bertner 2016.
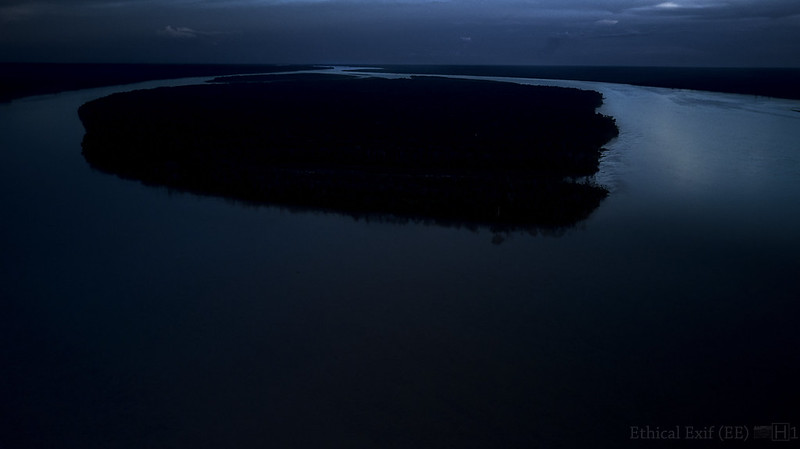
Mocagua island blue hour in the Colombian Amazon. Shot with DJI Mavic Pro. Copyright Paul Bertner 2018.

La Loberia on Floreana island, Galapagos, Ecuador. Shot with P3P drone. Copyright Paul Bertner 2016.
Bird’s eye perspectives, oriented straight downward, especially when when accentuated by geometrical shapes, or lines, can create an engaging aesthetic, especially when incorporated into a narrative.

Kayaking in the Brazilian Amazon. Shot with the DJI mavic Pro. Copyright Paul Bertner 2018.

Photo of Challuacocha lake at Sani lodge, Ecuador. Shot with the DJI Mavic Pro. Copyright Paul Bertner 2017.

Clouds reflected in the surface of Lago pan on Mocagua island, Colombian Amazon. Shot with the DJI Mavic Pro. Copyright Paul Bertner 2018.

Floreana beach, Galapagos, Ecuador. Photo taken with the P3P drone. Copyright Paul Bertner 2016.
Wide-angle landscape shots can provide impressive vistas, especially when lower perspectives are blocked by features in the landscape. The maneuverability of the drone means that it can be placed into crevasses, across water features, or other dangerous or inaccessible locations. One can also photograph the coming or retreating sun at higher altitudes before/after conventional ground-based photography (curvature of the earth and line-of-sight).
Sunrise around Tayrona national park, Colombian Caribbean. Shot with the DJI mavic Pro. Copyright Paul Bertner 2018.
Challuacocha at Sani lodge, bordering Yasuni National park, Ecuador. Shot with the P3P drone Copyright Paul Bertner 2017.
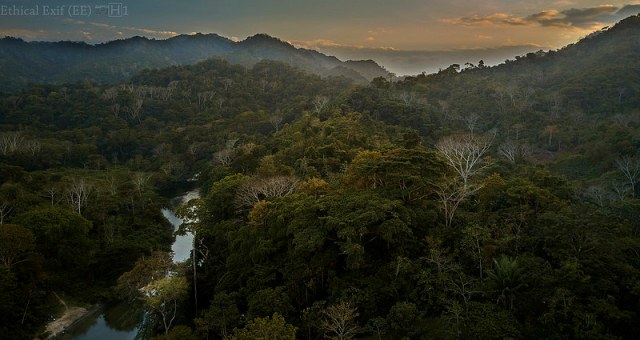
Clouds can completely change the atmosphere of a photo. I try and incorporate them to some extent whenever they are present and it makes sense to do so. However, one must also be careful of potentially exposing one’s drone to water damage in the form of excessive humidity or rain. Therefore it pays to keep a line of sight on the drone, to determine whether there is any rain coming from the clouds, and to have an exit strategy in case one loses sight and or control of the drone.

Challuacocha lake, partially obscured by cloud creates an enigmatic and atmospheric perspective. Shot with the DJI Mavic drone. Photo from Sani lodge, Ecuadorian Amazon, 2017.
Sunrise in the rainforest is a great time to fly, and low-lying mists over the canopy add great atmosphere.

Amazon sunrise from Sani lodge, bordering Yasuni national park, Ecuador. Shot with the P3P drone. Copyright Paul Bertner 2017.
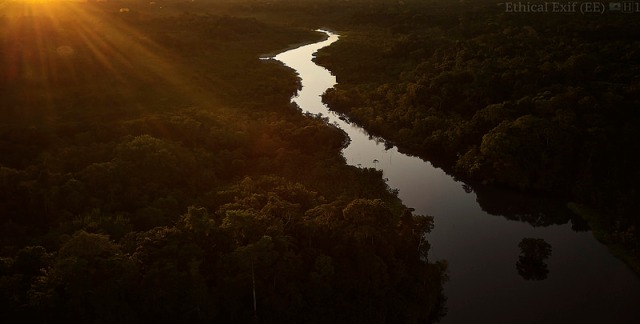
Golden hours still apply to drone photos, though be careful of the level of flare which can sometimes overcome the photo. Shot with the DJI Mavic Pro drone. Photo from Sani lodge, bordering Yasuni national park, Ecuador. Copyright Paul Bertner 2017.

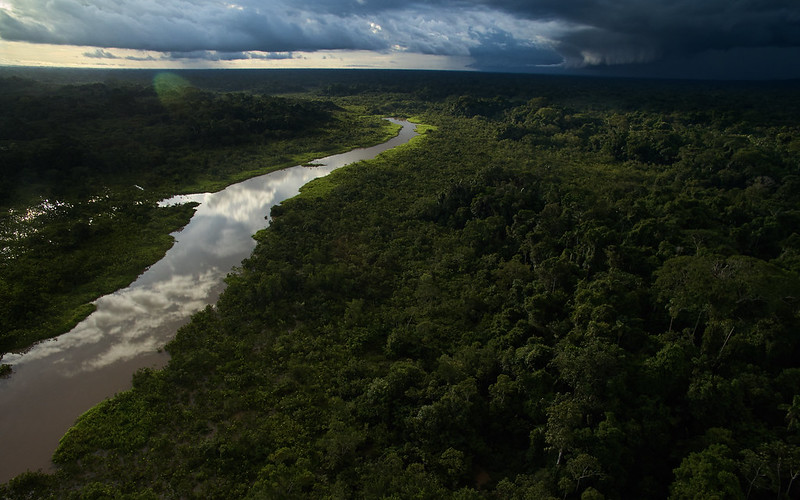
Photo showing a newly formed island brought in by strong river currents during a rainstorm at Sani lodge, bordering Yasuni national park, Ecuador. Shot with the DJI Mavic Pro drone. Copyright Paul Bertner 2017.
Sunrises are generally handled better than sunsets by the smaller sensors drones, the latter start to show significant noise at anything higher than ISO 200, and don’t handle highlight/shadow recovery particularly well.
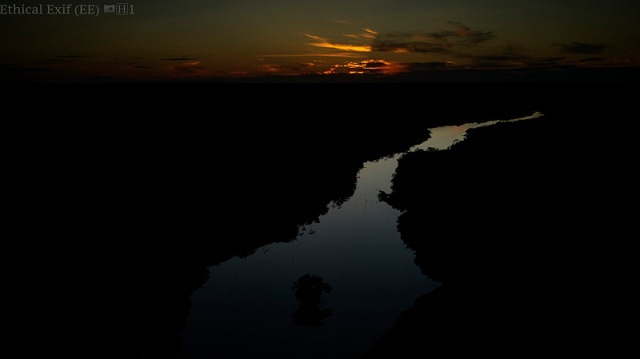
Challuacocha lake at sunset at Sani lodge, Ecuador. Photo taken with the DJI Mavic Pro. Copyright Paul Bertner 2017.

Canoeing on Challuacocha lake at sunset at Sani lodge, Ecuador. Photo taken with the DJI Mavic Pro. Copyright Paul Bertner 2017.
.
.
.
I will update this section with other landscape photos from future trips as well as any other tips or information that I come across that might be useful. If anyone has any suggestions or advice for landscape photography or how to improve this section you can either leave a comment or email me directly.
